Fixing Styling Issues with react-markdown: A Workaround
While using variable to pass the content Markdown feature is not working
Introduction
In this blog post, I will share my experience with a styling issue I encountered while using react-markdown. I will explain the problem I faced and how I initially attempted to solve it. I will also provide a step-by-step guide on the workaround I discovered, which successfully resolved the issue. By sharing this information, I hope to assist others who may be struggling with similar problems.
While using react-markdown, I encountered a situation where the styling was not being applied correctly when passing down markdown content through a variable. This inconsistency led to unexpected output, which was not aligned with my desired styling.
Initial Approach
Initially, I attempted to pass the markdown content directly without any modifications. However, this approach did not yield the desired results. The styling was not being rendered as expected, causing frustration and confusion.
import Markdown from 'react-markdown'
import remarkGfm from 'remark-gfm'

function BlogContent() {
  const markdown = `# Creating Your First Pull Request on GitHub

  In this tutorial, we will walk you through the process of creating your first pull request on GitHub. Pull requests are a way to propose changes to a repository and collaborate with others on open-source projects.

  ## Step 1: Fork the Repository

  The first step is to fork the repository you want to contribute to. Forking creates a copy of the repository under your GitHub account.

      1. Navigate to the repository on GitHub.
      2. Click on the "Fork" button in the top-right corner of the repository page.
      3. Wait for the repository to be forked to your account.

  ## Step 2: Clone the Forked Repository

  Next, you need to clone the forked repository to your local machine.

  ~~~py
  def hello_world():
      print("Hello World!")
  ~~~
  `;

  return (
    <div className="blog_content">
      <div className="blog_body">
        <Markdown remarkPlugins={[remarkGfm]} children={markdown} />
      </div>
    </div>
  )
}

export default BlogContent;
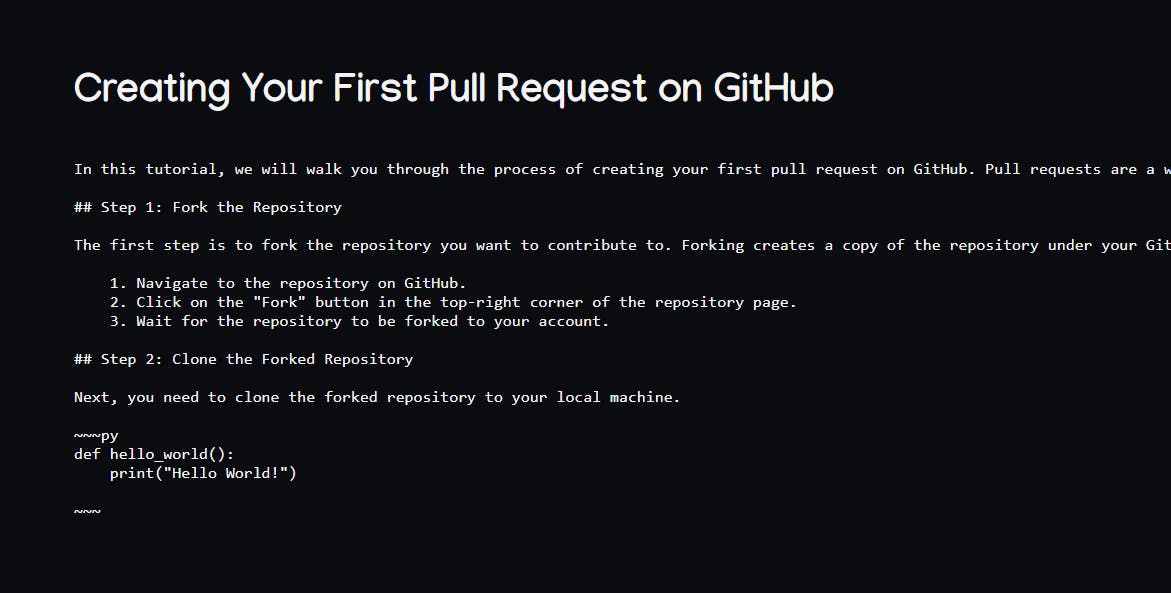
Which gave an output like this :

As you can see, only the first line which had the title got rendered as markdown everything else was treated as a 'pre' text.
Workaround
After some investigation, I discovered that the issue was related to the detection of new lines within the markdown content. To address this problem, I implemented a custom function called insertLineBreaks that would split the text into lines, trim each line, and then join them back together with new lines. This ensured that the new lines were recognized correctly by react-markdown.
Here is an example of the code for the custom function:
function insertLineBreaks(text) {
  const lines = text.split('\n');
  const modifiedText = lines.map(line => line.trim()).join('\n');
  return modifiedText;
}
Using the Workaround
To incorporate the workaround into the code, you can follow these steps:
Import the necessary dependencies:
import Markdown from 'react-markdown'andimport remarkGfm from 'remark-gfm'.Create a function called
BlogContentreturns the JSX code for your blog content.Define the markdown content as a string variable, let's call it
markdown.Pass the
markdownvariable as thechildrenprop to theMarkdowncomponent, along with theremarkGfmplugin and theinsertLineBreaksfunction call.
Here is an example of how the code would look:
import Markdown from 'react-markdown'
import remarkGfm from 'remark-gfm'

function insertLineBreaks(text) {
  const lines = text.split('\n');
  const modifiedText = lines.map(line => line.trim()).join('\n');
  return modifiedText;
}

function BlogContent() {
  const markdown = `# Creating Your First Pull Request on GitHub

  In this tutorial, we will walk you through the process of creating your first pull request on GitHub. Pull requests are a way to propose changes to a repository and collaborate with others on open-source projects.

  ## Step 1: Fork the Repository

  The first step is to fork the repository you want to contribute to. Forking creates a copy of the repository under your GitHub account.

      1. Navigate to the repository on GitHub.
      2. Click on the "Fork" button in the top-right corner of the repository page.
      3. Wait for the repository to be forked to your account.

  ## Step 2: Clone the Forked Repository

  Next, you need to clone the forked repository to your local machine.

  ~~~py
  def hello_world():
      print("Hello World!")
  ~~~
  `;

  return (
    <div className="blog_content">
      <div className="blog_body">
        <Markdown remarkPlugins={[remarkGfm]} children={insertLineBreaks(markdown)} />
      </div>
    </div>
  )
}

export default BlogContent;
Result
By implementing the workaround, the styling issue was successfully resolved. The markdown content was rendered correctly, with the new lines being recognized as intended.

Conclusion
In this blog post, I shared my experience with a styling issue I encountered while using react-markdown. I explained the problem I faced and the initial approach I took. I then provided a step-by-step guide on the workaround I discovered, which involved using the insertLineBreaks function to ensure proper rendering of new lines. By following this workaround, the styling issue was resolved, and the markdown content was rendered correctly. I hope this blog post serves as a helpful resource for others facing similar challenges with react-markdown.
